
Last Planner
User Guide
1. Introduction
The Last Planner module helps project teams plan daily work for the selected week. It provides a visual planning board where tasks are organised by location and day.
Use Last Planner to define owners, locations and tasks, assign tasks to the weekly plan, update task status and follow daily production progress.
2. Last Planner Workspace
The workspace contains week navigation, task assignment controls, the weekly planning board and task cards. Each row represents a location and each column represents a day of the selected week.
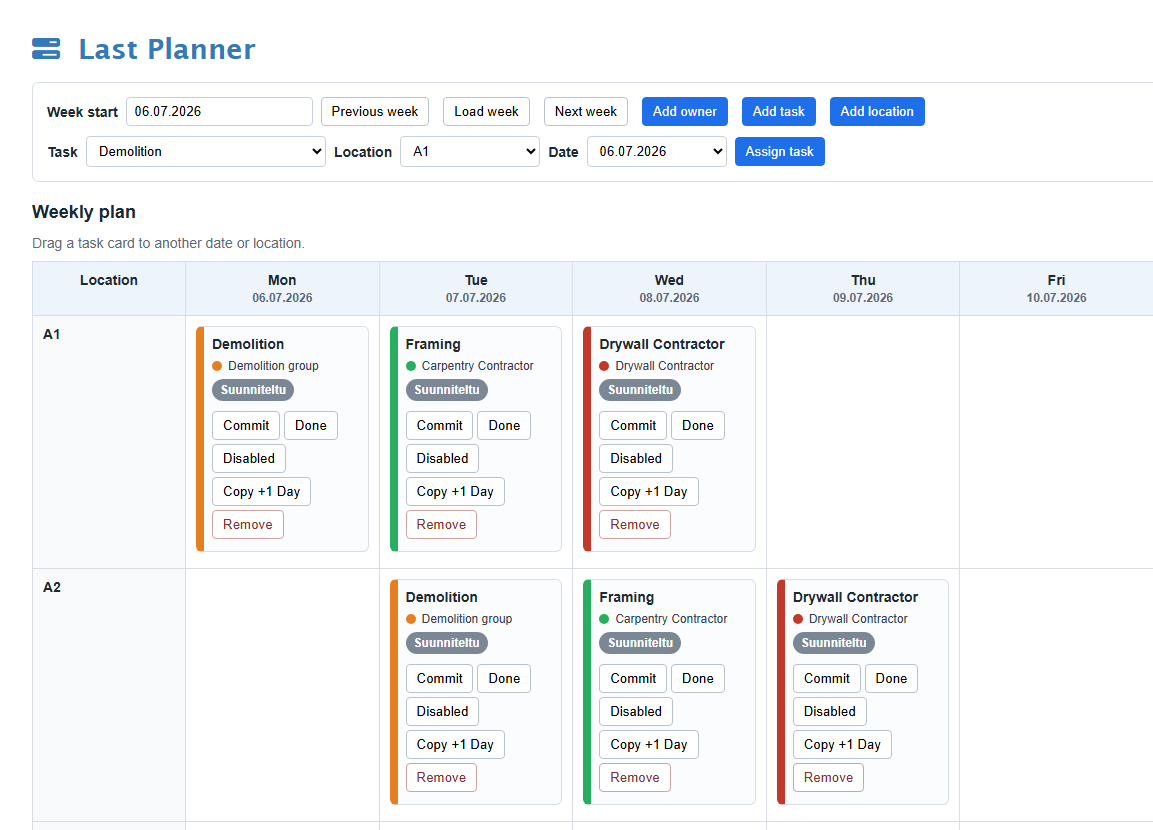
| Area | Description |
|---|---|
| Week start | Selects the Monday of the week shown on the board. |
| Previous week / Next week | Moves the planning view one week backward or forward. |
| Load week | Loads the selected week. |
| Add owner | Creates a person, team or contractor responsible for work. |
| Add task | Creates a reusable task that can be assigned to the plan. |
| Add location | Creates a location row on the board. |
| Assign task | Places the selected task into a location and date. |
| Planning board | Displays daily work by location and date. |
3. Week Navigation
The Last Planner board shows one week at a time. The selected week starts on Monday and displays the working days for that week.
- Enter or select the Week start date.
- Click Load week.
- Use Previous week or Next week to move between weeks.
4. Managing Owners
Owners represent the people, teams or contractors responsible for tasks. Each owner has a colour, which is shown on task cards.
Add an Owner
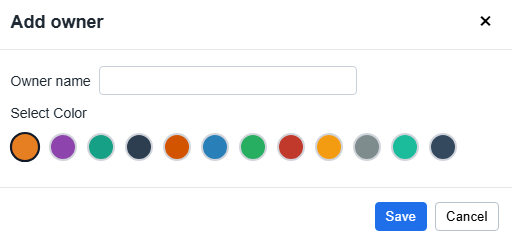
- Click Add owner.
- Enter the owner name.
- Select a colour.
- Click Save.
Edit or remove owners
Owners can be edited or removed from the owner list. If an owner is used by tasks, it may need to be kept active until those tasks are updated.
5. Managing Locations
Locations define where the work will be performed. Typical locations are rooms, areas, apartments, floors or zones.
Add a Location
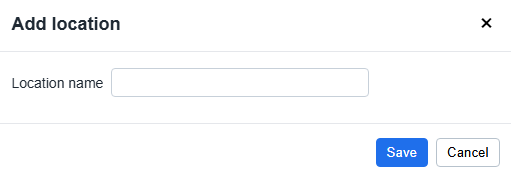
- Click Add location.
- Enter the location name.
- Click Save.
Edit or remove locations
Locations can be edited or removed when they are no longer needed. Keeping the location list clean makes the daily board easier to read.
6. Creating Tasks
Tasks define work activities that can later be assigned to the daily Last Planner board. Each task belongs to an owner.
Add a Task
- Click Add task.
- Enter the task name.
- Select the owner responsible for the task.
- Click Save.
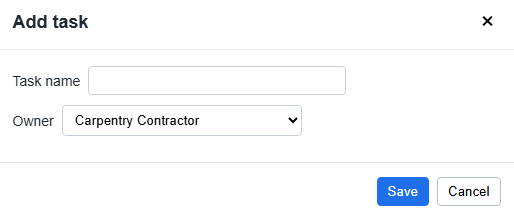
| Field | Description |
|---|---|
| Task name | Name of the work activity. |
| Owner | Person, team or contractor responsible for the task. |
7. Assigning Tasks to the Plan
After a task has been created, assign it to a specific location and date on the board.
- Select the task from the Task list.
- Select the Location.
- Select the Date.
- Click Assign task.
The task appears as a task card in the selected location and date cell.
8. Working with Task Cards
Each assigned task is displayed as a task card on the planning board. The card shows the task name, owner, current status and available actions.
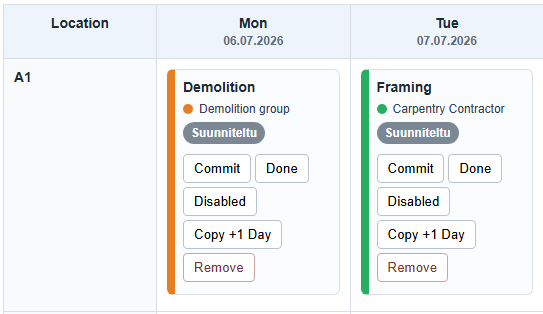
| Element | Description |
|---|---|
| Task name | Name of the planned work activity. |
| Owner | Person, team or contractor responsible for the task. |
| Status | Displays the current task status. |
| Commit | Confirms commitment to complete the task. |
| Done | Marks the task as completed. |
| Disabled | Marks the task as blocked or unable to continue. |
| Copy +1 Day | Creates a copy of the task on the next day. |
| Remove | Deletes the task from the plan. |
9. Task Status
Task status is used to track daily commitment and completion.
| Status | Meaning | When to use |
|---|---|---|
| Planned | The task has been assigned but work has not yet been committed. | Use when the task is part of the plan but not yet confirmed. |
| Commit | The owner has committed to completing the task. | Use when the task is agreed during the planning meeting. |
| Done | The work has been completed. | Use when the task is finished. |
| Disabled | The task cannot proceed. | Use when work is blocked or cannot continue. |
10. Moving, Copying and Removing Tasks
Move a task
Move a task by dragging the task card to another date or location on the board. The assignment updates automatically.
Copy a task to the next day
- Click Copy +1 Day on the task card.
- A copy of the task is created on the following day.
- Update the copied task if needed.
Remove a task
- Click Remove on the task card.
- Confirm the deletion if prompted.
11. Exporting and Reporting
The Last Planner board can be exported for meetings, reporting and offline review.
| Export option | Description |
|---|---|
| Current view PDF | Exports the visible board view. |
| Full board PDF | Exports the complete planning board. |
12. Best Practices
| Practice | Why it helps |
|---|---|
| Keep task names short and clear. | Task cards are easier to read during meetings. |
| Use consistent location names. | The board becomes easier to navigate. |
| Update statuses frequently. | The plan reflects the real site situation. |
| Assign clear owners. | Responsibilities are visible to the whole team. |
| Use Copy +1 Day only when the repeated task is still valid. | This avoids unnecessary duplicate work. |
13. FAQ
Why can I not add or edit tasks?
Your access may be read-only. Contact the project administrator.
Why does a task not appear on the board?
The task may not have been assigned to the selected date and location. Check the assignment controls.
Why can I not assign a task?
The same task may already exist in the selected location and date.
Why can I not remove an owner?
The owner may still be used by existing tasks.
Why can I not remove a location?
The location may still contain assigned tasks.
14. Troubleshooting
| Problem | Possible cause | Solution |
|---|---|---|
| The board is empty. | No tasks have been assigned to the selected week. | Select another week or assign tasks to the plan. |
| Task cannot be assigned. | Required selections are missing or the assignment already exists. | Check task, location and date. Avoid duplicate assignments. |
| Task cannot be moved. | The target location and date may already contain the same task. | Move the task elsewhere or remove the duplicate first. |
| Owner cannot be removed. | The owner is still used by tasks. | Update or remove related tasks first. |
| Location cannot be removed. | The location is still used by assigned tasks. | Move or remove related tasks first. |
| User cannot edit the plan. | User has read-only access. | Ask the project administrator to check access rights. |